Monster Oreo Pops
Updated
Updated
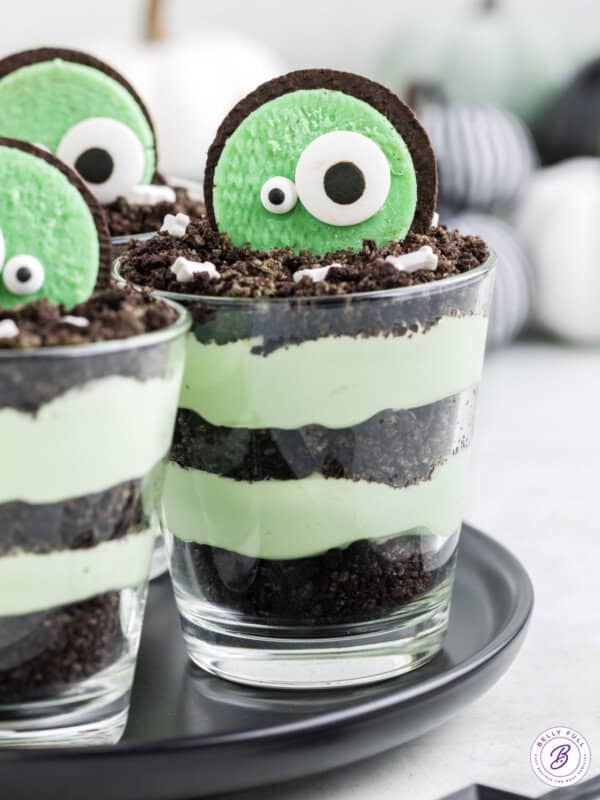
White chocolate covered Oreos decorated with candy eyes and sprinkles, these Halloween Monster Pops are a fun and easy Halloween treat. Perfect for Halloween parties or gift-giving and kid-approved!
Looking for more easy no-bake Halloween treats? We got you. Try our Mummy Oreo Balls and Bloodshot Eyeballs. So fun!

Pin this now to find it later
Pin ItThis post may contain affiliate links. If you click on one and make a purchase, we may earn a small commission at no extra cost to you. We only recommend products we genuinely love.
Easy Halloween Chocolate Covered Oreos
We’re in full-on Halloween mode now – costumes picked, house decorated, candy bought. And all our fun new Halloween desserts have been tested and approved. These Monster Pops, which are simply white chocolate covered Oreos topped with candy eyes and sprinkles, are the cutest, no?
These Halloween Oreos were a massive hit with everyone here, of course – I mean, how can you not love Oreos dipped in chocolate? If you have little kids that want to get involved, this is a great recipe for them, too. It’s easy, requires no baking, and they can get creative adding the candy eyes and sprinkles to make the monster’s face.
If you’re in charge of the classroom Halloween party snack, these monster pops are perfect. Just wrap them individually in cellophane bags and seal with a ribbon!

What You’ll Need
These white chocolate covered Oreos are made with just 4 ingredients.
(Scroll below to the printable recipe card for details and measurements.)
- Candy melts: I used green and orange to stick with the Halloween theme but you can use any color that you want your monsters to be.
- Oreos: I used traditional Oreos for these monster pops but blonde Oreos would work too.
- Candy eyeballs: You’ll want both small and large candy eyeballs for a variety of silly monster faces.
- Halloween sprinkles: Sprinkles add more fun color to the pops and can even be made to look like hair on the monster.
How to Make Monster Pops
If you’ve ever wondered how to make chocolate dipped Oreos, these easy monster pops are a great place to start.
(For all the details, scroll below to the complete printable recipe card.)
- Melt the orange candy melts. Melt the chocolate according to package directions, until melted and smooth.
- Add the sticks to the Oreos. Twist open each of the Oreos. Dip the ends of each popsicle stick into the chocolate then press into the Oreo cream. Add the top of the cookie back. Transfer to the fridge for 10 minutes.
- Melt the green candy melts. Melt the green candy melts according to the package directions, until melted and smooth.
- Assemble the monster pops. Begin dipping the Oreos into the chocolate of your choice. Quickly add a few eyes and add sprinkles if desired. Repeat until cookies are decorated.
- Chill. Place in the fridge for 30 minutes to set before enjoying.

FAQs
Here are some questions I commonly receive about making chocolate dipped Oreos, from what type of chocolate to use to how to ensure the Oreos stick together:
- My chocolate is very thick. What can I do? If your chocolate is too thick once melted, you can stir in coconut oil to thin it. Start with one teaspoon at a time until it’s the desired consistency.
- Melting wafers or candy melts vs white chocolate chips. I prefer Wilton candy melts or Ghirardelli white melting wafers for these white chocolate dipped Oreos and other candy-making. They have a smooth consistency when melted and once dried and hardened, they don’t soften at room temperature. If you want to use regular white chocolate or white chocolate chips, I recommend combining it with some coconut oil which will help it thicken up and harden faster. You’ll need around 1 tablespoon of coconut oil per 1 cup of chocolate.
- My Oreo will not stay on the stick. What can I do? If you don’t use enough chocolate on the stick, this can happen. You want to make sure there is enough that the chocolate pools up a little bit so the cookie will stick.
- What kind of fork did you use for dipping the chocolate? I used a dipping fork that I got here. I love to use them because more of the chocolate can drip off, so it doesn’t leave as big of a chocolate foot.

Serving Suggestions
For a fun display at a party, you can display your Halloween dipped Oreos in florist foam, covered in festive paper. These will also fit in a cake pop holder, if you have one. To give these as a gift, you can also place them in a decorative bag sealed with a ribbon. Those are perfect for classroom Halloween parties!
How to Store
You can store your chocolate covered Oreo pops at room temperature for about a day, just be sure to keep them out of direct sunlight. Otherwise, store in the fridge for up to a week. If you need to layer them, place parchment paper between each layer of monster oreos.
More Fun Halloween Recipes:
I hope you love this delicious and easy recipe – be sure to give it a review below! Also don’t forget to follow Belly Full on TikTok, Facebook, Instagram, Pinterest, and YouTube!
Monster Oreo Pops

Ingredients
- 12 ounces orange candy melts
- 12 ounces green candy melts
- 16 Oreos
- 1 package candy eyes, , small
- 1 package candy eyes, , large
- 2 ounces Halloween sprinkles
- lollipop sticks
Instructions
- Line a sheet pan with parchment paper or a silicone mat.
- Melt your orange candy melts in a small bowl according to package directions, stirring until it's all melted and smooth.
- Gently twist open the Oreos. Dip the end of the lollipop sticks into the chocolate, press them into the oreo cream and place the top cookies back on the filling. (Make sure there is enough melted chocolate on the stick that it pools up a little bit so the cookie will stick.)
- Place the assembled cookies onto the prepared sheet pan and transfer into the fridge for 10 minutes to allow the chocolate to set.
- Melt your green candy melts in a small bowl according to package directions, stirring until it's all melted and smooth.
- Dip an Oreo into one of the colored chocolates until it's fully covered, place a few eyes onto the Oreos and then sprinkle some of the sprinkles onto the top part of the oreo. Repeat this until all the cookies are decorated.
- Place the cookies into the fridge for 30 minutes to allow the chocolate to set completely.NOTE: for FAQs, tips, and storage, please refer to the article.
Nutrition
Nutritional information given is an automatic calculation and can vary based on the exact products you use and any changes you make to the recipe. If these numbers are very important to you, I would recommend calculating them yourself.