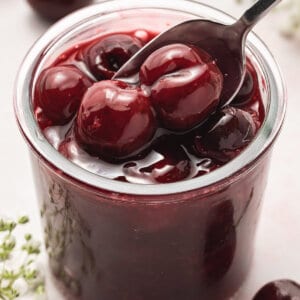
Cherry Pie Filling
Updated
Updated
With just 5 ingredients needed, this Homemade Cherry Pie Filling is so easy to make that you’ll never buy the jarred version again. Quick and easy, this cherry topping is perfect for so many desserts – not just pie!

Pin this now to find it later
Pin ItThis post may contain affiliate links. If you click on one and make a purchase, we may earn a small commission at no extra cost to you. We only recommend products we genuinely love.
Easy Cherry Pie Filling Recipe
If you’ve ever considered making a cherry pie from scratch, this homemade cherry pie filling is the recipe you’ve been waiting for. It’s quick and easy to prepare and requires just 5 basic ingredients.
All you need to do is cook the fresh cherries on the stovetop, thicken them with a cornstarch slurry, and allow them to cool. Then store in the fridge until you’re ready to bake or add straight to your pie crust.
Not a pie fan? This cherry topping works on cheesecake, ice cream sundaes, and more! It’s a great way to add a burst of sweet and tart cherry flavor to any dessert.
If apple pie is more your style, be sure to check out my apple pie filling recipe as well.
Why You’ll Love This Homemade Cherry Pie Filling
Here are a few reasons why you’ll love this homemade version.
- Only 5 ingredients. All you need is cherries, sugar, lemon, cornstarch, and almond extract. Easy peasy!
- Can be made in advance. Cherry pie filling will last for up to 5 days in the fridge, so you can easily make this a day or two in advance.
- Versatile. In addition to the obvious use of making a pie, this cherry filling can be used as a cheesecake topping, in ice cream, and much more.

Ingredients Needed
This cherry pie filling recipe requires just 5 ingredients.
(Scroll below to the printable recipe card for details and measurements.)
- Cherries – See notes below.
- Granulated sugar – To balance out the tartness of the cherries.
- Lemon – You’ll want both fresh lemon juice and lemon zest for your cherry topping.
- Cornstarch – Thickens the cherry filling.
- Water
- Almond extract – You can also use vanilla extract if you don’t want quite as strong of a cherry flavor.
What Cherries Should I Use?
Fresh sweet cherries are used in this recipe, but you can also use tart/sour cherries. If using tart cherries, I’d recommend adjusting the amount of sugar to 3/4 cup to balance the taste.
Frozen cherries can also be used, but you might need to decrease the amount of water a bit, since they release more liquid and increase the cooking time by an additional 2 minutes or so.

How to Make Cherry Pie Filling
Homemade pie filling is easier to make than you may think. Here are the few simple steps to making this recipe.
(Scroll below to the printable recipe card for details and measurements.)
- Cook the cherries. Combine the pitted cherries, sugar, lemon juice, and lemon zest over medium-high heat. Bring to a boil then reduce heat. Simmer for 8 minutes, stirring frequently.
- Thicken the sauce. Combine the cornstarch and water to create a slurry. Add to the pot and simmer for an additional 2-3 minutes, until the mixture becomes glossy and clear. Taste test and add more sugar or lemon juice as necessary.
- Add the extract. Remove the cherry filling from heat and stir in the almond or vanilla extract.
- Cool. All to cool completely before using or storing in a glass jar.
Tips & Variations
Here are a few tips for making your homemade cherry pie filling.
- Try it with vanilla extract. Vanilla extract can be used instead of almond extract for less of a cherry flavor if preferred.
- Add some cinnamon. Consider adding in some cinnamon for a warm flavor.
- You can substitute cornstarch with gelatin powder. Make sure to bloom the gelatin before adding it to the recipe.
- Reduce the recipe. If you don’t need the full recipe for a pie, simply cut the ingredients in half.

Ways to Use Homemade Cherry Pie Filling
The cherry topping isn’t just for pies! It can be used as a topping for ice cream, yogurt parfaits, pancakes, waffles, crepes, and cakes.
Here are a few specific ways I love to use this recipe:
- Cherry Dump Cake
- No Bake Cherry Cheesecake
- Black Forest Ice Cream Sundae
- Boozy Black Forest Milkshake
- Cherry Cheesecake in a Jar
Proper Storage
- Fridge. The cherry filling can be stored in an airtight container in the refrigerator for up to 5 days.
- Freezer. It can also be frozen for up to 3 months. Thaw in the fridge overnight. Note that it will become thicker once chilled.
- Reheat. Reheat gently in the microwave or on the stovetop to get a glossy finish again.
I hope you love this delicious and easy recipe – be sure to give it a review below! Also don’t forget to follow Belly Full on TikTok, Facebook, Instagram, Pinterest, and YouTube!
Cherry Pie Filling
Ingredients
- 6 cups fresh sweet dark cherries, , pitted (about 3 pounds)
- 1/2 cup granulated sugar
- 1 tablespoon fresh lemon juice
- 2 teaspoons lemon zest
- 1/4 cup cornstarch
- 1/2 cup water
- 1/2 teaspoon almond or vanilla extract
Instructions
- In a large pot over medium-high heat, combine pitted cherries, sugar, lemon juice, and lemon zest. Bring the mixture to a boil, then reduce the heat to medium-low and simmer, stirring frequently, for about 8 minutes until the cherries start to soften.
- In a small bowl, mix cornstarch with water until thoroughly combined to create a slurry. Add to the pot and continue to simmer, stirring, for another 2 to 3 minutes until the mixture thickens and becomes glossy and clear.
- Give it a taste (careful, it will be hot!) and adjust if necessary, adding more sugar or lemon juice.
- Remove the cherry filling from the heat and stir in the almond extract (avoid over-stirring to keep the cherries intact.)
- Let it cool completely and if not using right away, store in a glass jar fitted with a lid.
Notes
Nutrition
Nutritional information given is an automatic calculation and can vary based on the exact products you use and any changes you make to the recipe. If these numbers are very important to you, I would recommend calculating them yourself.


Do you know if it’s possible to reduce the sugar in this? I’m watching my intake, so while a half cup is not a lot in theory, if I could cut it down to say 1/4 or 1/3 it would definitely be slightly more approved as a sometimes treat.
Hi Amber – technically you can, but I don’t recommend it or the filling will taste too tart. You can try it, though.
Loved this recipe, thank you!