Cheesy Popovers
Updated
Updated
With a crispy outside, hollow inside, and light, buttery taste, these Cheesy Popovers are one of a kind and hands down winner in the world of dinner rolls. This popover recipe is taken up a level with gruyere and fresh thyme and go with any meal.
These pair perfectly with chicken, pork, or beef, and we love them dipped in soups like our slow cooker beef stew, Hungarian mushroom soup, and zuppa toscana!

Pin this now to find it later
Pin ItThis post may contain affiliate links. If you click on one and make a purchase, we may earn a small commission at no extra cost to you. We only recommend products we genuinely love.
Popover Recipe with Cheese and Herbs
Ah, the impressive popover! Basically my favorite roll ever and one my kids beg for every single week. While nothing beats the classic, sometimes I like to doctor up my popular popover recipe a bit by adding cheese and fresh herbs, in this case freshly shredded gruyere and thyme.
While these are typically served as a dinner side, they are also perfectly suited for breakfast or brunch, for any occasion. There’s nothing quite like them!
What are Popovers?
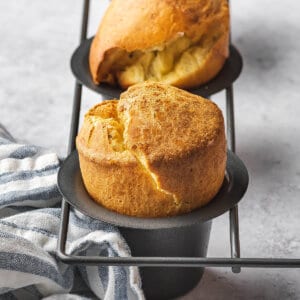
A popover is an extra tall airy roll, baked in a special pan specifically invented for them, which has deep wells and straight-walled sides. They’re also unique in that they’re made from an egg batter, without yeast, baking soda, or baking powder. No kneading or rising required.
Yorkshire Pudding vs. Popovers. They’re basically the same thing, made using the same batter. The difference is popovers are typically baked in a butter-coated popover pan, whereas Yorkshire pudding is baked in beef drippings.

Ingredients Needed
You only need five pantry items, plus some cheese and fresh herbs to make these rolls.
(Scroll below to the printable recipe card for details and measurements.)
- Eggs – These give the rolls structure. They should be room temperature before cracking.
- Whole milk – Should be lukewarm (about 110 degrees F.)
- All-purpose flour – Spooned and leveled for accurate measuring.
- Gruyere cheese – This is a buttery, smooth type of Swiss cheese. It should be freshly shredded off the block for best flavor.
- Fresh Thyme – This is our herb of choice for this recipe, which pairs perfectly with the Swiss cheese. It’s a bit earthy and minty, savory but also sweet, and not nearly as strong as rosemary. Use fresh for optimal flavor.
- Salt – To heighten the other flavors.
- Butter – Adds richness and necessary moisture to the batter. It should be melted and cooled slightly.
How to Make Cheesy Popovers
This popover recipe is so incredibly easy to make in just a few simple steps. No kneading or rising dough to deal with. Here’s a brief summary:
(Scroll down to the printable recipe card for details and measurements, and don’t miss the video below.)
- Blend the batter. Blend the eggs, milk, and salt in a blender. Add flour, shredded cheese, and minced thyme blending until smooth; then add the melted butter at the end, blending until frothy.
- Let batter rest. Let the batter rest in the blender for 15 minutes, while the oven preheats to 450°F.
- Warm up the popover pan. Place a 6-slot special popover pan on a baking sheet; put on the lower rack of oven for the last few minutes of the oven preheating.
- Spray the pan generously. Spray the hot pan all over (including inside the wells and the outside rim) with nonstick cooking spray.
- Fill the slots with the batter. Pour the rested batter evenly into the muffin slots, almost to the top.
- Bake. Bake at 450°F for 20 minutes, then reduce the heat to 350°F and bake another 10 minutes. (They should be tall with a domed top, and deep, golden brown.)
- Release some steam. Remove from the oven and pierce the top or bottom of each with the tip of a pairing knife, to release steam and help prevent sogginess.Serve. Slip them out of the pan and serve immediately with butter!

Tips for Success
Making this recipe for popovers is so easy! However, their success is all in the details. Here are some tips to make sure your popovers rise tall, are airy and not dense.
- Use a special popover pan. See note below.
- Spoon and level the flour. Don’t scoop! This ensures you measure the proper amount.
- Have the eggs at room temperature (before cracking) and the milk warm before mixing. This forms an emulsion which traps air. While baking in the oven, that trapped air expands and produces a fluffy baked good.
- Allow the batter to rest at room temperature while the oven preheats. Resting the batter really does result in better-risen popovers with an airier texture (as opposed to chewy). At least 15 minutes allows the starch molecules to expand and the gluten to relax.
- Spray the tin generously with nonstick spray, including the inside of the wells and also the rim, so those gorgeous rolls pop right out.
- Position an oven rack on a lower third shelf. If the fully risen popovers are too close to the top of the oven, they could burn.
- Don’t open the oven door while they’re baking. This could cause them to deflate. IF they are browning too much, you can open the door toward the last 5 minutes and quickly place a cookie sheet on a top oven rack to shield the popover’s tops from the heat.
- Let the steam escape once they’re done baking. Popovers lose their crispiness if they linger in the pan, so turn them out on a wire rack immediately and make a small slit in the side of each with a paring knife to let the steam out.
Popover Pan
Some say you can use a regular muffin tin to make popovers, but I 100% disagree. There’s a reason why a special popover pan exists, specifically for these rolls. You need one!
Popover pans differ from regular muffin pans: They have deep, steep-sided wells, which propels the batter upward while baking, resulting in an extra tall roll with a puffy top and crisp exterior. In addition, most popover pans have the cups welded to the wire rack. This isn’t for art’s sake, but rather promotes even circulation of air and heat around the tins.

Video: Cheesy Popovers Recipe
What to Serve with Popovers
Cheesy popovers are a fantastic roll to serve for breakfast, brunch, or a dinner side, for weeknights, holidays, or any occasion. Pair them with a baked chicken breast, chicken noodle soup, roasted pork tenderloin, or Salisbury steak. We love to spread one with a little butter or even herb butter. They’re also delicious with a bit of bacon jam or homemade ricotta cheese.
Proper Storage
These cheesy popovers are ideally enjoyed right after baking, so if at all possible, bake and serve them fresh from the oven. The longer they sit, they tend to lose their height and crispness.
- Can you reheat popovers? Yes. Just warm them in a 350°F oven until warm and crispy again, about 5 minutes.
- Can you freeze popovers? Yes. Freeze baked and cooled popovers in an airtight, freezer-safe bag for up to 2 months. To reheat, place the popovers directly from the freezer into a 350° oven and bake until warm and crispy, about 8 minutes.
- Can you make popover batter ahead of time? The batter should rest for at least 15 minutes at room temperature, but no more than 1 hour. Give it a stir before filling the popover pan.
More Dinner Roll and Bread Recipes:
I hope you love this delicious and easy recipe – be sure to give it a review below! Also don’t forget to follow Belly Full on TikTok, Facebook, Instagram, Pinterest, and YouTube!
Cheesy Popovers
Ingredients
- 4 large eggs, , room temperature before cracking
- 1 & 1/2 cups whole milk, , lukewarm (about 110 degrees F)
- 3/4 teaspoon salt
- 1 & 1/2 cups all-purpose flour, , spooned and leveled
- 1 cup freshly shredded Gruyere cheese
- 1 tablespoon finely minced fresh thyme
- 3 tablespoons melted butter, , cooled slightly
Instructions
- Using a blender, blend eggs, milk, and salt. Add flour, shredded cheese, and minced thyme blending until smooth; then add the melted butter at the end, blending until frothy.
- Let batter rest in the blender for 15 minutes while you preheat the oven.
- Preheat the oven to 450 degrees F and place rack in the bottom third position (to make room for tall popovers and to ensure the tops don’t burn!) and another rack in the top position.
- Place a 6-slot special popover pan on a baking sheet; put on the lower rack of oven for 2 minutes while oven is preheating.
- Spray the hot pan all over (including inside the wells and the outside rim) with nonstick cooking spray.
- Pour the rested batter evenly into the muffin slots, almost to the top.
- Bake the popovers for 20 minutes without opening the oven door. Reduce the heat to 350°F (again without opening the door), and bake for an additional 10 minutes, until they're tall, have "popped" over the tops of the pan, and are a deep, golden brown.(Without opening the oven door, check them with the oven light during the last 5 minutes to make sure they’re not over-browning. If necessary, quickly open the door and put a cookie sheet on that upper rack to shield the popovers' tops from direct heat.)
- Remove them from the oven, and pierce the top or bottom of each with the tip of a pairing knife, to release steam and help prevent sogginess.
- Slip them out of the pan, split open and serve with butter!NOTE: Make sure to use a specific popover pan and not a regular muffin tin, and refer to the article for helpful tips.
Video
Nutrition
Nutritional information given is an automatic calculation and can vary based on the exact products you use and any changes you make to the recipe. If these numbers are very important to you, I would recommend calculating them yourself.


I love the flavor combo in these! I did a test run for Thanksgiving and will be making them again for sure.
Just delicious. They came out perfect – nice and tall with a domed top and golden all over. I’m going to play with the cheese and herbs, but they’re definitely delicious as is!
These popovers are beautiful.
Some of my favorite memories are of eating popovers with my dad at a fancy restaurant as a kid. I made this recipe and got all sorts of oohs and aaahs when I served them. Love this recipe so much!
Mmm… popovers! The best! Gotta try these!
I needed another muffin tin like a hole in the head LOL. But it’s soooo worth it. Love this recipe so much and will use the popover pan often. I left out the thyme because my kids *eye roll*
Of course, you know we love popovers because I made them when you were young. However, adding Gruyere cheese has got to be heavenly. Will try next time I make them.
I’ve been wanting to make popovers for ages and these did not disappoint! Once I discovered they didn’t include yeast I knew I stood a fighting chance. LOL. Thank you for the tips and video. We loved these!
I have always used pyrex custard cups but they don’t really turn out and certainly don’t look half as good as yours. Adding the cheese and herb sounds wonderful.
oh my goodness!!! These gruyere and thyme popovers are amazing!!!
I can honestly say that I don’t remember ever having a popover before I met Amy. I was a popover…um…neophyte. Now? I’m pretty close to going to one of those meetings were you start by saying, “Hi. I’m Paul. I love popovers.”
These popovers were PERFECT. I did use dried thyme, but will definitely use fresh next time.
Hi Amy, your popover caught my eye on Foodgawker.. and then guryere and thyme… enough said! Delicious recipe!
My family loves this recipe so much. I used to use a muffin tin, and you’re right – they just don’t come out. The popover pan is the only way to go. This recipe turns out perfectly tall and crisp and airy in the middle.
I make yorkshire pudding every year for Christmas – never thought of adding cheese and herbs. DUH! Love this version.
Bought a popover pan just so I could make these and prayed I didn’t waste my money. Happy to report, it was money well spent! These are my new favorite roll!!
Served these for a ladies brunch and they were GONE. I used a combination of sage and thyme. Yum!
Delicious!
Dug out my dusty popover pan to make these – LOVED the addition of cheese and thyme. Never would have thought to add those ingredients.
I first made popovers as a project in high school French class and I adored them. Hadn’t had them in years and was so excited to find this recipe – it was even better than I remembered!