Mint Chocolate Chip No Bake Cheesecake
Published
Published
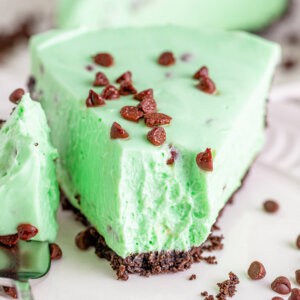
Luscious and creamy, this Mint Chocolate Chip No Bake Cheesecake is an easy dessert to make with a smooth filling and Oreo crust. Perfect for hot summer days, St. Patrick’s Day, or Christmas!
Another no bake, mint and Oreo cookie combination are these Oreo Truffles, and you only need 3 ingredients.

Pin this now to find it later
Pin ItThis post may contain affiliate links. If you click on one and make a purchase, we may earn a small commission at no extra cost to you. We only recommend products we genuinely love.
An Easy No Bake Cheesecake Recipe
Whether it’s traditional cheesecake or no bake cheesecakes, I love them all, but you just can’t beat the ease of a no bake dessert. There are numerous no bake recipes already on this website; this Mint Chocolate Chip Cheesecake is our latest addition and it’s a big winner.
This easy no bake cheesecake has just the perfect amount of both mint and chocolate, to keep it minty fresh and sweet at the same time. The filling is luscious, super smooth, and creamy – exactly how a cheesecake should be. And since there’s no baking required, it comes together quickly and easily. No need to make the crust, wait, make a water bath, bake the filling, spend 2 hours slowly cooling it, then transfer it to the fridge.
With the green color, this mint cheesecake is perfect for Christmas and winter but also makes an easy St. Patrick’s Day dessert. Plus, with no baking required and the mint flavor, it’s ideal for summer too. Basically, this is a great year-round dessert.

What You’ll Need
This no bake cheesecake recipe requires just a handful of ingredients, including a 2-ingredient crust.
(Scroll below to the printable recipe card for details and measurements.)
- Oreos and Unsalted Butter – For the crust.
- Cream cheese – Use softened cream cheese so that it’s easier to combine.
- Sugar – Both granulated sugar and powdered sugar are used for optimal sweetness and texture.
- Heavy whipping cream – Helps keep the filling stable.
- Mini chocolate chips – Adds the “chocolate chip” to “mint chocolate chip”.
- Peppermint extract – Adds the mint flavor to the cheesecake.
- Food coloring – Green gel food coloring gives this mint cheesecake the perfect color.

How to Make Mint Chocolate Chip Cheesecake
My favorite thing about this cheesecake? There’s no water bath or slow cooling time. Just prepare the crust, prepare the filling, and chill. To make this mint chocolate chip cheesecake recipe, follow the steps below included in the printable recipe card. Make sure to refer back to the article for all the helpful tips.
Tips for Success
If this is your first time making mint cheesecake or any no bake cheesecake, keep these helpful tips in mind.
- Make sure the heavy whipping cream forms stiff peaks. The heavy whipping cream is what stabilizes the cheesecake filling, so it’s imperative to whip it fully, until it’s forming stiff peaks.
- Press the crust down firmly. I like to use the bottom of a flat glass or measuring cup to pack the crumbs in place.
- Start with a small amount of peppermint extract. Since different peppermint extracts are more potent than others, I like to start with just 1/4 teaspoon of peppermint extract to the mix then taste from there. You will be surprised how much mint flavor you get from so little extract.
- Chill overnight. This no-bake cheesecake needs at least 8 hours in the fridge but preparing it the day before so it can chill overnight is best.

Cheesecake Topping Ideas
While you can certainly serve this cheesecake as-is, sometimes it’s fun to add a little something extra before serving. Here are a few of my favorite cheesecake toppings:
- Whipped cream
- More mini chocolate chips
- Chocolate sauce
- Chopped Andes mints
- Mint Oreo cookie crumbs
How to Store & Freeze
- How to store no-bake cheesecake. This mint chocolate chip cheesecake needs to be refrigerated right up until serving and any leftovers should be promptly returned to the fridge. If it’s left out for more than an hour, it will begin to wilt.
- Can I freeze no-bake cheesecake? Yes, you can freeze this mint chocolate chip no bake cheesecake. It’s important to note that it still must chill in the fridge before freezing. Remove it from the pan and wrap tightly in plastic wrap and also in aluminum foil. Freeze for up to 3 months and thaw in the fridge overnight.
More Cheesecake Recipes:
I hope you love this delicious and easy recipe – be sure to give it a review below! Also don’t forget to follow Belly Full on TikTok, Facebook, Instagram, Pinterest, and YouTube!
Mint Chocolate Chip No Bake Cheesecake
Ingredients
For the Crust
- 30 whole Oreos
- 7 tablespoons unsalted butter, (melted)
For the Filling
- 24 ounces cream cheese, (softened to room temperature)
- 1/2 cup granulated sugar
- 3/4 cup powdered sugar
- 1 teaspoon peppermint extract
- 1 1/4 cup heavy whipping cream
- green gel food coloring
- 1/2 cup mini chocolate chips
Instructions
- Place the Oreos in the bowl of a food processor; pulse until they are tiny crumbs. Drizzle in the melted butter. Give it a stir with a spoon to make sure the crumbs are coated in the butter.
- Press the crumbs into a 9-inch springform pan on the bottom and up the sides. (I like to use the bottom of a flat glass or measuring cup to pack the crumbs in place.)
- Place the crust in the freezer while you prepare the filling.
- In a large bowl, whip the cream cheese with an electric hand mixer (you can also do this with a stand mixer and the paddle attachment.) Add the granulated sugar and mix it in. Add the powdered sugar, vanilla, and 1/2 teaspoon peppermint extract; mix to combine. Set aside.
- In a medium bowl using an electric hand mixer, whip the heavy cream to stiff peaks – do not overbeat or it will be clumpy.
- Fold the whipped cream into the cream cheese mixture until there are no streaks left. (Taste and add the remaining 1/2 teaspoon peppermint extract if you want more of a mint flavor.) Add a few drops of green gel food coloring to your desired color – a little bit of food coloring goes a long way (or leave it out if you don't care about it being green.) Fold it in gently.
- Fold in the chocolate chips.
- Add the filling to the crust and smooth out the top. Add more chocolate chips on top, if desired. Cover and place in the fridge for at least 8 hours, ideally overnight.
- Take off the outer attachment of the pan, slice, and serve with toppings or as is.
Notes
Nutrition
Nutritional information given is an automatic calculation and can vary based on the exact products you use and any changes you make to the recipe. If these numbers are very important to you, I would recommend calculating them yourself.


Love!! So delicious.