Frozen Chocolate Banana Pops
Updated
Updated


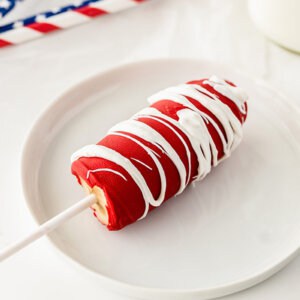
Serve a new kind of frozen treat for 4th of July and summer this year! Frozen chocolate bananas all dressed up in red, white, and, blue! This recipe is so easy using fruit, colored candy melts, and lollipop sticks.

Bananas. Meh. Not my favorite fruit. I mean, unless they’re used for Pan Fried Honey Banana, Banana Cream Lush, or in Banana Bread. OR Frozen Chocolate Covered Bananas… now we’re talking!
My kids love these frozen chocolate banana pops, usually coated in regular chocolate, but this year I thought I would put a red, white, and blue spin on them for the 4th of July. Aren’t they fun?

Ingredients for frozen chocolate banana pops
You only need 5 super simple items, plus lollipop sticks for this recipe:
- Bananas
- Royal blue candy melts
- Red candy melts
- White candy melts
- Red, white, blue sprinkles
- Lollipop sticks
How To Make frozen chocolate banana pops
These banana pops could not be easier! (Scroll to the bottom for complete recipe and printable.)
Just cut peeled bananas in half, insert a lollipop stick into each and freeze until firm. Then dip in melted red, white, and blue candy melts; drizzle with more candy melts and decorate with sprinkles.
Freeze until ready to serve. Enjoy straight from the freezer or allow them to sit at room temperature for about 10 minutes before eating.

Recipe Variations
- You can leave the melted chocolate bare or sprinkle with chopped nuts, shredded coconut, toffee bits, granola, sprinkles or jimmies, or other crushed candies.
- Use different colored candy melts to suit your holiday.
- Popsicle sticks can be used instead of lollipop sticks, if you prefer.
- Candy melts are preferred over regular chocolate for these banana pops, since they tend to melt faster, have a smoother look, and hold up better when out of the freezer.
Recipe Tips
- You’ll want to use just ripe bananas for this – perfectly yellow, but no black spots. If they’re too soft, they’re harder to work with.
- Make sure you slice them in half crosswise, not lengthwise, or they won’t be stable enough to hold upright with the lollipop stick.
- Use lollipop sticks that are 4” long, which will aid in the stability of the frozen bananas.
- Insert the lollipop stick BEFORE freezing the bananas. Adding it in after they’re frozen can cause the banana slices to split apart.
- Freeze the bananas BEFORE AND AFTER you dip in the melted chocolate. This ensures the bananas are completely frozen and gives the chocolate a solid surface to stick to.
How to Store Frozen Chocolate Bananas
Keep these frozen until ready to serve. Store them in an airtight container or a freezer-safe plastic bag for up to 2 weeks.

These are such a quick, easy, refreshing treat on a summer day to satisfy your sweet tooth!
Other fun 4th of July Recipes!
- (Red White Blue) Cheesecake Mousse Parfaits
- (Patriotic) Muddy Buddies
- Red White Blue Dessert Fruit Kabobs
- Layered Ice Cubes
I hope you love this delicious and easy recipe – be sure to give it a review below! Also don’t forget to follow Belly Full on Facebook, Instagram, Pinterest, and YouTube!
Frozen Chocolate Banana Popsicles
Ingredients
- 4 large bananas
- 12 ounce bag of royal blue candy melts
- 12 ounce bag of red candy melts
- 12 ounce bag of white candy melts
- Red, white, blue sprinkles
- Lollipop sticks
Instructions
- Line a large baking sheet with parchment paper.
- Peel bananas and slice in half crosswise (not lengthwise) so you have 8 banana pieces; insert a lollipop stick into the cut end of each one until it's stable. Place on the baking sheet and transfer to the freezer until firm, about 1 hour.
- In separate bowls, melt the candy melts according to package directions.
- Dip each banana into the melted chocolate (2 white, 2 blue, 2 red), making sure they’re smooth and allowing any excess to drip off. Transfer back to the lined baking sheet.
- Lightly drizzle each one with an opposite colored chocolate and top with a few sprinkles.
- Freeze until ready to serve. Enjoy straight from the freezer or allow them to sit at room temperature for about 10 minutes before eating.
Notes
Nutrition
Nutritional information given is an automatic calculation and can vary based on the exact products you use and any changes you make to the recipe. If these numbers are very important to you, I would recommend calculating them yourself.