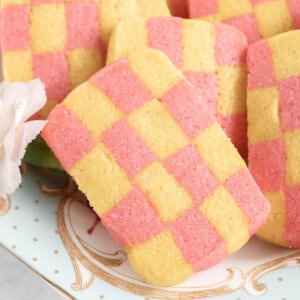
Checkerboard Icebox Cookies
Updated
Updated
These fun Checkerboard Icebox Cookies are perfect for springtime or Easter and look so impressive on a buffet table. They’re made using pantry staples, just the right amount of sweetness, and both vanilla and almond extract for the best flavor.

Pin this now to find it later
Pin ItThis post may contain affiliate links. If you click on one and make a purchase, we may earn a small commission at no extra cost to you. We only recommend products we genuinely love.
Fun & Easy Icebox Cookies
These Checkerboard Icebox Cookies are another fun variation on classic sugar cookies. They join my other sugar cookie recipes, including 3-ingredient sugar cookies, cut out sugar cookies, chocolate sugar cookies, and brown sugar cookies.
This two toned cookie is made from just one simple sugar cookie dough, flavored with vanilla and almond extracts, and is then split and colored with gel food color. Some simple stacking and slicing will get you a fun checkerboard pattern.
The dough for these icebox cookies is thick and on the stickier side, but this also makes it easier to work with and allows the dough strips to stay together without the need for egg white in between the layers like some other recipes for checkerboard cookies.
What Are Icebox Cookies?
Icebox cookies are an old-fashioned sugar cookie, traditionally made with simple ingredients like flour, butter, baking powder, sugar, and salt. The name “icebox cookie” comes from the fact the dough was typically chilled overnight in the fridge (aka icebox).
These checkerboard cookies are a twist on that classic recipe, with just a few ingredient adjustments and a fun color pattern. Plus, there’s no need to chill the dough overnight – 2 & 1/2 hours is plenty.

Recipe Ingredients
These classic cookies are made with very basic ingredients that you likely already have in your cupboard.
(Scroll below to the printable recipe card for details and measurements.)
- All-purpose Flour – Use the spoon and level technique for accurate measuring.
- Salt – To balance out the sweetness.
- Baking powder – The small amount of baking powder helps the cookies puff up just slightly while keeping them from spreading and distorting the pattern.
- Butter – Unsalted or regular salted can be used. I opt for salted butter in these checkerboard cookies for added flavor.
- Sugar – For sweetness.
- Egg – You’ll need 1 egg and also an additional egg yolk.
- Extracts – Both vanilla and almond extract are included for the best flavor.
- Food coloring – I used yellow and pink for spring but you can use any colors you’d like.

How to Make Checkerboard Icebox Cookies
These checkerboard cookies are so fun to make. But be aware there are several different chill times.
(Scroll below to the printable recipe card for details and measurements.)
- Sift the dry ingredients. Sift together the flour, salt, and baking powder. Set aside.
- Cream the butter. Cream the butter and sugar until light and fluffy. Add the egg, egg yolk, and extracts.
- Combine the ingredients. Add the flour mixture, beating on low until the dough comes together. Transfer to a clean work surface and divide in half.
- Add the food coloring. Place half of the dough back in the bowl. Add the food coloring to reach your desired color. Mix on medium, until the dye is evenly distributed throughout the dough. Transfer to plastic wrap, pat into a square, and refrigerate. Repeat with the remaining dough and the second color.
- Chill. Chill both parts of the dough for at least an hour.
- Build the checkerboard pattern. Gently roll the dough into 6×6 squares that are 1/2-inch thick. Layer the yellow square on top of the pink square. Cut them in half, then stack the halves on top of each other. Mark the short side with 8 even markings.
- Chill. Wrap the stack in plastic and chill for 30 minutes.
- Cut into strips. Cut the dough into 8 even strips. Stack 4 strips together, alternating colors to create a checkerboard pattern.
- Chill. Tightly wrap in plastic, pressing together so they are compressed but keep their shape. Chill for an hour.
- Bake. Preheat the oven to 350F. Cut the log into 1/4″ inch thick slices. Bake for 11 to 13 minutes, then transfer to a cooling rack to cool.
Can I Skip Some Of The Chill Time?
The chill time is key to making these checkerboard cookies. Because the dough is on the heavier side, it is imperative that we keep chilling it throughout this process. This will keep the colors of the dough from blending in together too much, and keeps the pattern sharp. It also helps the baked cookies to spread less when the dough is cold.

Tips for Success
Here are a few tips for making these icebox cookies for the first time.
- Stick with gel food coloring. You can choose whatever different color schemes you’d like, but gel food coloring will work much better than the liquid drops.
- Try using more colors. You could also choose up to 4 different colors, just divide the dough into quarters before adding the coloring.
- Don’t overmix the dough. The dough is going to be a bit sticky, that’s okay. Just mix until all of the ingredients are incorporated.
- Avoid overbaking. Bake the cookies just until they’re set and lightly browned on the bottoms. They’ll continue to bake as they cool.
Proper Storage
- Can I Make The Dough In Advance? Yes! Checkerboard icebox cookie dough is perfect for making in advance. The ready to slice uncooked dough logs can be stored, wrapped tightly in plastic wrap in the fridge for up to 3 days, or frozen for up to 3 months. Just slice and bake. Cookies can be baked directly from frozen, just add 2-3 minutes to bake time.
- Storing leftovers. Baked cookies will keep in an airtight container on the counter for up to 4 days.
- Freeze. You can also freeze checkerboard cookies for up to 3 months. Just let cool completely then place in an airtight, freezer-safe container. Thaw on the counter and enjoy.
More Cookie Recipes:
- DoubleTree Cookies
- Easy Sugar Cookies
- Snickerdoodle Cookies
- Lofthouse Cookies
- Pistachio Cookies
- Creamsicle Cookies
I hope you love this delicious and easy recipe – be sure to give it a review below! Also don’t forget to follow Belly Full on TikTok, Facebook, Instagram, Pinterest, and YouTube!
Checkerboard Icebox Cookies
Ingredients
- 2 & 1/2 cups all-purpose flour, , spooned and leveled
- 1/2 teaspoon salt
- 1/2 teaspoon baking powder
- 1 cup regular salted butter, , room temperature (2 sticks)
- 1 cup granulated sugar
- 1 large egg plus 1 egg yolk
- 1 teaspoon vanilla extract
- 1 teaspoon almond extract
- food coloring of choice, (I used yellow and pink)
Instructions
- In a small bowl, sift together the flour, salt and baking powder. Set aside.
- In the bowl of a stand mixer or a bowl with a hand mixer, cream together the butter and sugar until light and fluffy, about 3 minutes. Add the egg, egg yolk, and both extracts and beat until well incorporated. Scrape the bowl and mix again.
- With the mixer on low speed, add the flour mixture, just until the dough comes together. The dough will be thick and on the stickier side.
- Transfer the dough to a clean work surface. Divide the dough in half.
- Place one half of the dough back into the mixing bowl and color with the yellow food coloring, adding 2-5 drops to reach your desired color. Mix on medium speed, just until the color is completely mixed in and even throughout the dough. Remove from the mixer and place on plastic wrap, pat into a square and tightly wrap the dough to refrigerate for at least 1 hour. Quickly clean out the mixing bowl and repeat this process with the other half of the dough and the pink food coloring.
- Once both doughs have chilled for at least 1 hour, gently roll them out so that they are in a 6”x6” square and that they are both 1/2-inch thick. These doughs should be the same size and thickness. Use a 1/2- inch rolling pin guide to get the most accurate results.
- To build the checkerboard pattern: Layer the yellow dough square on top of the pink square, making sure they are the same size. Cut these stacked squares in half, this will give you 2, 3”x6” rectangles. Stack these on top of one another, creating a pattern of pink, yellow, pink, yellow. Gently mark the short 3-inch side of the dough stack with 8 even markings. (You will be cutting 8 even strips down the length of the dough stack.)
- Gently wrap the stack and stick it back in the fridge for 30 minutes. Then remove from the fridge and cut the 8 even strips. Each strip will have the same pink, yellow, pink, yellow pattern. Stack 4 of these strips together, alternating or flipping every other slice, this will create a checkerboard pattern log. Repeat with the remaining 4 strips of dough to create 2 logs.FOR VISUAL HELP, REFER TO THE PICTURES.
- Tightly wrap the logs in plastic wrap, gently pressing the logs together so they don't lose the rectangular shape, but the doughs are compressed. Chill for another 1 hour.
- To make the cookies, preheat your oven to 350F and line a sheet pan with parchment paper. Remove the dough logs from their plastic wrap and trim off the end pieces. Cut the log into 1/4-inch thick slices and place on the sheet pan 1 inch apart.
- Bake for 11-13 minutes, or until the cookies are just set and firm and starting to brown on the bottom. Don't overbake.
- Transfer to a cooling rack and allow to cool completely.
Nutrition
Nutritional information given is an automatic calculation and can vary based on the exact products you use and any changes you make to the recipe. If these numbers are very important to you, I would recommend calculating them yourself.


This recipe is so cute!! I just had a few questions – would the recipe in terms of how the cookies are rolled out be different if I doubled the recipe?? Also, are the cookies crunchy or soft cookies? Thanks so much!! ?